Managing your RDS Cluster like a hero: PART 2
Getting the best of Terraform, Ansible, and GitHub Actions.

In my previous post, you learned how to create a simple RDS Cluster on AWS using Terraform.
Let’s recover the to-do list that contains our next steps to be done:
Setting up the application user and database
Assigning the user an admin role in the said database
Running migrations to establish the database tables
If we use a bastion host, we can ssh into it using AWS System Manager and then connect to the database using the admin password and run a couple of Postgres queries to do those configurations.
However, my plan is to skip the need of the bastion host to do those configurations. This will deliver a couple of things that I find important:
The Ansible Playbook will run via automation;
We will have a track of the changes made in the database – because we are using Git;
We won’t need to get the admin password from Secrets Manager and hard-coded it in Ansible Vault;
The Ansible Playbook will be only run when approved by a superior (manager or sr engineer) – bureaucracy can save lives.
Part 1 – Secrets Manager
To log in into a database, we require a user and a password. However, hard-coded passwords that are not rotated, can be a liability to our database. To avoid this issue, we use AWS Secrets Manager to manage our database password. This is configured in the line 28 of the terraform configuration.
The default configuration of Secrets Manager will rotate the database password every seven days. If you log in to the AWS Console, you will be able to read the username and password if you have the proper IAM permissions.
Part 2 – Infrastructure
Since we are not using a bastion host, we need to create an infrastructure to run the Ansible Playbook. The chosen stack was: Lambda + ECR + ECS Task.
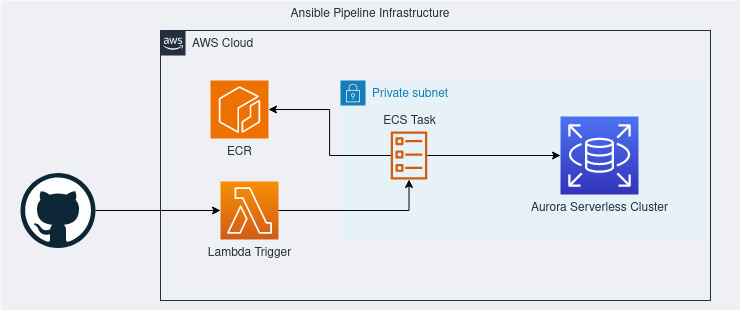
You may think that I could skip the ECS Task and run the Ansible directly from a Lambda function. However, the Lambda infrastructure doesn’t allow access to a system path that Ansible needs to do multiprocessing, even with a container runtime. This is an issue that we don’t have while triggering an ECS Task from the Lambda.
Terraform:
To store our custom Ansible image – That will contain our playbook
This function uses AWS SDK to trigger the run of a Task Definition(TD). I’m configuring it using Terraform because of the network configuration that needs to be passed to the TD to run the container on the proper network.
Note that I’m using MUTABLE tags to avoid fatigue of updating the image in the lambda function. When I do this, I always double tag an image with the tag
latestand a git hash + date of deploy likeprd-14-09-2023-HASH.
We need to add this IAM policy, so Ansible can pull the Admin password from Secrets Manager. We attach to the Task Execution role of ECS.
Note that I’m skipping some configurations for brevity. For all of this to work we need a cloudwatch log group, ecs security group configuration and ecs iam roles for execution.
Part 3 – Ansible Playbook
Now that we have our infrastructure in place, we have to write the Playbook. A playbook is a collection of tasks that we will run. It’s similar to Terraform – a playbook to rule them all – but we have more flexibility while managing all sorts of infrastructure.
To allow replicability between other clusters, the first tasks of the playbook will search for our cluster and retrieve the Secrets Manager ARN. You may skip this, passing all the info directly using variables. However, automation is better.
The first step is to define the name of the playbook, the target hosts and some variables. Here is the first difference from a usual playbook, the host’s target: We are using localhost because we will run the playbook locally.
Within the variables, we define the values that we will need to run the rest of the tasks. For simplicity, I’m defining them within the playbook, but there are handful ways to manage variables in Ansible.

In the next block, we will inspect the Cluster information to find the Secrets Manager ARN. I needed a Regex to extract the ARN from the path because AWS likes to give us the needed info in the middle of other data. Thanks, ChatGPT, for the regex.

Now, we finally get to the part that we were all expecting. The Postgres configuration.
With these tasks, we create a new database in the cluster and a user:

Now we give our newest user all the powers in the database that we created:

Finally, remember the line 29 of our Cluster configuration? We need to allow our user to be able to authenticate with the cluster using IAM RDS Authentication. With this kind of authentication, we generate temporary credentials for the application to use to connect to the cluster, also avoiding hard-coded passwords that we won’t rotate.

Find the full playbook here.
A gotcha
To allow IAM Authentication, you need to create an IAM Policy that allows the user to do that. Make sure that the user that you configure in the policy matches the one in the playbook. Refer to AWS Docs on IAM Auth to discover how to do the auth programmatically. If you don’t have this proper configured, you will get stranger errors while trying to authenticate.
We do have one more part related to the GitHub Actions pipeline and some final thoughts about this adventure, but I think that the alert of maximum characters in a post/email will appear soon. See you soon in the third and final part.
That’s all folks!

